Showing posts with label Craft Corner. Show all posts

Friday, August 11, 2017

Wine & Beer Wedding Table Names

One of my very good friends got married and boy, did they throw a party! When I'd imagined the perfect outdoor wedding reception, this was it! Everything from the hydrangea flowers, painted recycled bottles, use of burlap and lace, mason jars guest favors, outdoor games, frames hanging from a tree photo booth came together to create a cohesive, elegant and rustic outdoor celebration.

Guests found their tables by finding their name attached by a clothespin to a vintage door. After finding their name, guests deposited the clothespin in the basket and took a bare mason jar to stick their name tag.  Jars served as our drink glass for the night and were offered as favors as a keepsake.  Using mason jars is a downright genius idea for outdoor weddings!


The Bride and Groom distinguished their mason jar glasses from their guests by having them on a pedestal. What a fun and non-generic keepsake!


In love with DIY projects and hydrangeas, Sam's simple centerpieces were the perfect touch.  She took recycled glass bottles and painted them shades of purple to tie in her wedding color, then accented them with the burlap and lace. Small baby food jars made easy votives to arrange on the tables. One of the details I really enjoyed was the names of the tables. I always like when couples go beyond the basic numbered table and add a little creativity into their seating assignments. The two of them did a combo of beer and wine, just like the combo of glass bottles.  Check out Math Wedding Table Names if you're looking for another original table naming idea.

Benefits of using wine/beer table names include: can be year around, can be a fair representation of both couples taste, would be adorable for a vineyard setting, if the couple frequents vineyards/breweries and so forth. Small touches like these simple DIY centerpieces are what helps to personalize a wedding. Plus, they are just so darn cute.


Wine/Beer Types:

White Zinfandel
Pilsner
Champagne
Chianti
Saison
Belgian Wheat
Hefeweizen
Merlot
Rochbier
Pinot grigio
Barleywine
Milk stout
Bordeaux
Pinot noir
Porter
Riesling
Cabernet sauvignon
Ruby Port
Prosecco
Syrah
Chardonnay
Helles Bock
Kolsch
Altbier
Oktoberfest
Blonde Ale
Shiraz
English Bitter
Scotch Ale
Red Ale
Malbec
Sauvignon Blanc
Sherry
Pale Ale
Erin Dahlin Photography
Other Ways to Personalize a Wedding: 

Friday, April 7, 2017

DIY Twine Eggs

Hello!! Sorry for the brief blog hiatus, Marie and I have been very busy bees lately! I am so excited to share all of the Easter crafts that I have been working on. So cute, easy and kind to the wallet! Tonight I am geeking out about these beautiful twine eggs.

DIY Twine Easter Eggs

Supplies:
- Foam eggs (Plastic would work too!)
- Twine or rope
- Glue gun

Directions:
1. Begin at the wider end of the egg. I learned this the hard way! It is very hard to wrap the twine when starting on the smaller end. Glue the end of the twine to the egg. 
2. Start to wrap the twine so that each layer is flush with the last. Add glue as needed.
3. Complete the egg by gluing the last bit of twine to the top of the egg. 

Simple, sweet and shabby chic! 


Monday, April 3, 2017

Easter DIY Projects

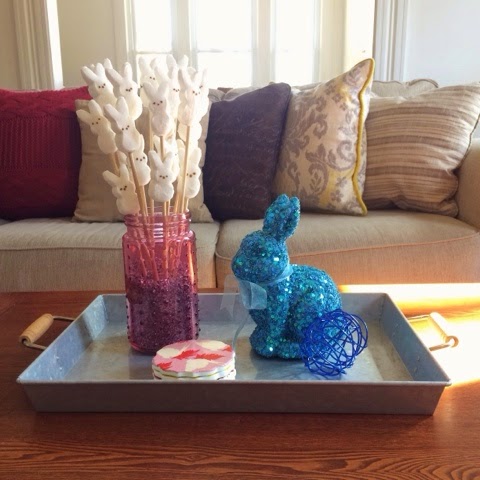
This past weekend was chalk full of Easter crafts. Mostly because I know that eggs and bunnies have a limited time within our house but also because it is finally spring!! I have been sharing some of these crafts through Instagram but wanted to post some tutorials in case anyone is interested in trying them this weekend.

Sequin Egg

Supplies:
- Sequins
- Pins or nails
*Note: I used thin craft nails found at Michael's
- Foam egg

Directions:
1. Starting at the top, begin pinning each sequin into place with a pin.
2. Make sure to cover each sequin so that the white foam does not show. Continue pinning the sequence until the egg is covered.


String Egg

Supplies:
- String
- Hot glue gun
- Foam egg

Directions:
1. Starting at the top, glue down the first piece of string. Begin wrapping the string around the foam, gluing as you go.
2. Continue gluing until the egg is covered. Carefully place a dot of glue at the bottom of the egg and glue the end of the string into place.


Bunny Bouquet

Supplies:
- Two packages of Peeps
- Wooden dowels
*I found a package of 16 dowels for $1.97 at Walmart.
- Vase or jar
*Note: I used vase filler to keep the dowels upright

Directions:
1. Take a sharp knife and cut each Peep in half.
2. Insert the wooden dowel into the open Peep and then stick the marshmallow closed.
*Note: I did some dowels with two bunnies and some with one on the top.
3. Position your bunny sticks as you prefer.


Monday, February 6, 2017

DIY Cork Board Arrow


Recently, I have had an intense desire to re-organize and re-arrange our home. Is anyone else suffering from this?! I am wondering if it is the time of year or if I just need a fresh look. Either way, I have found a couple projects to help... so far!

I just finished a new command center area in our kitchen. A command center is usually your "drop site" for all things scheduling and paperwork. I will share more photos of the whole set up soon but for now, here are all the details on my super easy and quick DIY cord board arrow project.

DIY Cork Board Arrow

Supplies:
- Wooden shape (Arrow from Target)
- One 12 by 12 inch cork pad
- Glue (Hot glue or E6000 preferred)
- Scissors
- Push pins, as desired

Directions:
1. Start by measuring out each piece to match the arrow shape. I only needed one piece of cork pad but you may need more depending on your shape. I preferred my arrow to look like it was different pieces versus one whole piece so cut mine accordingly.


2. Glue each cork piece as desired. I had to be careful to hold mine in place until secure.


3. Allow the glue adequate time to dry before hanging on the wall or inserting push pins.


Wednesday, February 1, 2017

Paper Arrows

Valentine's Day is right around the corner! While some complain that it is a Hallmark holiday, I think we should all use it to spread a little extra love. Send an old friend a card in the mail, send a valentine to your godbaby or just write some simple words of appreciation to your other half.

One craft that I will be including in my valentines this year are these pretty paper arrows. Arrows have become a huge trend of late. I have been seeing them everywhere! Since I have a total feather obsession, I find arrows quite lovely. Naturally, I had to try to DIY a few of my own.


Supplies:
- Paper Straws (Found at Walmart)
- Wasabi Tape (Found at Target)
- Card Stock (Found at Michaels)
- String and/or yarn (Found at Michaels and Target)
- Hot Glue Gun
- Scissors


Directions:
1. Start by cutting out different size feathers from the card stock. Also, cut out the tips of the arrows as well.
2. Hot glue the feather cut outs to one end of the paper straw. Glue the arrow tip to the other end.
3. Wrap the top of the arrow with string or yarn. Glue into place.
4. Embellish as desired!

These beauties will be accompanying some other valentine's day goodies. I cannot wait to send them out to loved ones! Bring it on Cupid! XOXO


Sunday, January 29, 2017

DIY Paper Roses

This darling heart canvas was used on my wedding day and is now perfect to pull out for Valentine's Day! 

Since I recently used it to decorate our home for Love Day, I thought would resurface this blog post to share with those who are looking to add some pretty heart elements to their home this season.

Paper Roses

Supplies:
- Card stock paper in varied colors and patterns
- Glue gun
- Scissors
- Canvas or other base piece


Directions:
1. Begin by cutting circles. I cut different sizes so that my roses were different sizes. Then cut a spiral in the circle. I preferred my roses to not have perfect edges but if you want perfect edges, cut your spiral edges in the same length.
2. Begin wrapping your rose from the outside edge of the spiral and twist into the center.
3. Glue as you go but ultimately, glue the paper together at the end. 


4. Position roses on your canvas as desired. I used a burlap canvas, one of my new favorite things! I placed the roses into a heart and hot glued them in place.


If hearts are not your thing, I have used these paper roses in several other ways!

I wanted to find some inexpensive ways to bring more yellow into our gray/white/yellow bedroom theme. I also had a frame that no longer had a glass piece. I whipped up a couple of these paper roses and painted the frame to match the decor. We get so many compliments on our wall arrangement! 

I just love how easy and dynamic these paper roses are. Happy crafting!!


Saturday, January 21, 2017

Black & White Striped DIY Canvas Art

This weekend, I finally put away our Christmas and New Years decor. All except the Christmas tree! I am allowing that to stay up at least one more week. Baby steps.

My husband told me, "It looks so empty in here." I think I fell a little more in love with him after that comment. I always feel that way after putting away the gold tinsel, glittery nutcrackers and sweet little snowman. Plus, in Minnesnowta, winter is still raging on through March. Why shouldn't holiday sparkle?

Well, I packed everything away and to fill the void, I pulled out the Valentine's Day decor. I do love the sweet hearts and shiny "I love you" signs. To add to the set up, I did a little canvas project that is inspired by my Kate Spade agenda.

I have shared some pictures on IG of my darling planners over the years. I have always been totally calendar obsessed, that baby comes everywhere with me. Knowing this, I invested a bit more on my planner this year. I have been loving it! One of my faves is an old planner pattern which is simple but girlie, I replicated it for my Kate Spade inspired canvas project.


Black & White Striped DIY Canvas Art

Supplies:
- Canvas (I used an 8x10)
- Paint (I used black acrylic paint)
- Painter's Tape
- Craft Tape (I used an adhesive gold glitter tape)
- Wooden letter or shape (Mine was purchased at Michaels)

Directions:
1. I started by taping down the areas that I wanted to stay white. Be sure to press the tape down firmly to avoid bubbles.
2. Paint the open areas with the black paint. Paint two coats.
3. Remove the tape and allow to dry.
4. Since my lines weren't perfectly straight due to using low quality painter's tape that bubbled, I used craft tape to cover the lines. I used half inch craft tape and cut it into smaller pieces. Stick or glue into place.
5. Glue on your shape or letter. Allow time to dry before hanging.


Saturday, January 7, 2017

DIY Hexagon Canvas Art


I love trying new projects. These days, I especially appreciate the ones that I can start and finish in a reasonable amount of time. Lately, I have been seeing pictures of a geometric canvas on Pinterest and wanted to try it out myself. I tried it on a relatively small canvas and completed it while watching a movie with my husband. I would love to try it on a larger canvas because it would make for some interesting and cool house decor. You could also add a monogram, image or other fun elements to personalize the canvas.

Supplies:

- Geometric paper punch (I used a Creative Memories Hexagon Punch)
- Four 12x12 pieces of paper
- Canvas (I used an 8x10 canvas)
- Glue gun or ModPodge
- Scissors


Directions:

1. Cut out the paper using the punch. I decided on a pattern and punched paper as needed.
2. Begin gluing on the paper. I left a little space between paper pieces in order to create a pattern.
3. Cut any pieces that do not need to be full.
4. I will be putting a sealing spray or glue over the canvas to help preserve the paper longer.
5. Add any letters or images desired.