Summer is here and it's time to grill outdoors and enjoy al fresco dining! Hooray! Take a look at these items you'll find this summer to inspire your cooking. I included some quick and easy recipes for sides and desserts if you want to try something simple to compliment your summer meals. There's a lot to be excited for this summer, including these great options to keep you happy and healthy.
Bell Peppers Chiles
Corn Cucumbers
Eggplant Green Beans
Lettuce Melons
Nectarines Peaches
Plums Summer Squash
Tomatoes Zucchini
Quick Sides:
Romaine Lettuce: easy salad to make with this is to add to the romaine, chopped cucumbers, tomatoes and olives with a yogurt herb based dressing.
Zucchini: If you have a garden filled with zucchini here's an easy recipe. Use a peeler to cut the zucchini into thin strips. Then boil in salted water until the veggie is tender. Lastly you'll toss with olive oil and grated lemon zest for flavor.
Corn: (my favorite summertime food) brush the corn cobs with olive oil then sprinkle some salt and pepper. Grill the cobs over a hot fire, making sure to rotate them often until they are tender and crisp, about 10 minutes.
Quick Desserts:
Peaches: Pit the peaches then halve them. Next you'll brush melted butter over the peaches and grill over medium until they are well browned. After 8 minutes on the grill sprinkle with gingersnaps or crumbled cookie.
Plums: Slice the plums into thin slices and serve with a fruit sorbet.
Cantaloupe, Honeydew or Watermelon: Cut your melon into wedges, chill these in the fridge and serve with some sea salt and chile powder to sprinkle on the top.
Friday, May 30, 2014
Tuesday, May 27, 2014
Minnie Mouse : Baby Shower

Food and drinks:
 - Brunch foods including egg bake and muffins.
- Minnie Mouse fruit bows. Made with two halves of strawberries on a toothpick and a blueberry in between.
- Red juice to fit the theme with stripped red paper straws.
Games:
- Guess the baby food. We had 10 different jars and enjoyed the faces made at a few different foods.
- We had a line for each letter in "Congratulations" and ladies had two minutes to write down baby related words for each letter.
- We didn't try this but a Disney or Mickey Mouse guessing game would fit the theme well.
Decor:
- Minnie Mouse cups for the pens for games.
- Red paper fans and glitter coasters used as hanging polka dots. We also hung Mickey and Minnie socks.
- Minnie Mouse stuffed figure and white board for the drinks table.

- Circus
- Little Pumpkin
- Little Man
- Peter Rabbit
- Pumpkin Diaper Cakes
- Traditional Diaper Cakes
- Building a Baby Basket
Monday, May 26, 2014
DIY Hanging Paper Birdcages
 Looking for a fun craft to add to a shower you're throwing, well here you go! This craft takes only about half an hour, and can be made with inexpensive materials that you can likely find in your home. It's a great way to add that personal touch to the shower you're throwing. Two themed showers that this hanging birdcage can make an appearance in are a Lovebirds Bridal Shower and a Nesting Baby Shower.
 You can add your own flair to the basic idea of the birdcage. Use fun paper and frills to spice it up, or go for a basic look. Depending on the color scheme of the shower, you have lots of options open to you. Using thicker paper for the cage, you may even be able to make centerpieces.
It was so much fun to make these hanging birdcages for my cousin & blog partner Lisa. This was just one of the many crafts that pull together the theme of her Lovebirds Bridal Shower. You'll be able to check out more ideas for throwing the "tweetest" lovebirds theme on the blog.
 Materials:
Paper Birds
Paper - (computer or scrapbook paper)
Note cards or Stock paper
Stapler
Tape
Scissors/Paper cutter
Pin/needle
String
Assembly Instructions:
25 minutes per birdcage
1) Make paper birds to hang in the bird cages. You can choose to make the birds colored and the cages white, or the cages colored and the birds white.

2) Using 8x11 computer paper I cut two even strips (about 1/3 of the paper each) to make the base of the bird cage. I then stapled the two strips together at the seems to make the circular base.
3) With the left over paper I cut small even strips to make the "bars" of the birdcage.
4) I then attached one side of each strip to the inside of the circular base, by taping them. Make sure to space the paper strips evenly around the base.
5) To create a firm top of the cage I taped two note cards together, and then preceded to cut the cards into a large enough circle to attach all the thin strips to.
 6) Next I attached all the thin strips of the paper to the circular top of the cage. The easiest way to do this is hold the circle above the center of the cage and then attach the paper strips with tape one by one to make sure the bars stay evenly spaced and arc outwards. When the cages aren't hanging it will look like the picture, with the paper still maintaining its shape once it's hanged.
7. Next you use a pin to poke a hole through the small circle. You also need to poke a hole in the paper bird, make sure to poke it where the bird will remain balanced when hanging.
8. Using twine or string, thread through the hole in the bird and tie a large knot.
9. Cut the string long enough to give you room to adjust the hanging height of the birdcage. Next you thread the string through the top circle. Adjust the string so that the bird hangs at a good height in the cage. If you cut the hole in the top small enough it shouldn't move up and down on the string. If you did not you may need to secure using another knot or tape to restrict movement.
And there you have it! Now your homemade birdcage is ready to be used for decoration!
If you're using these hanging bird cages at a LoveBirds Bridal Shower or a Nesting Baby Shower, you may want to make more than one. They look great hanging in pairs at differing heights. And the great thing is if you want to extend the use past the party they keep their shape if stored in a box or you can hang them in a kid's room too.
Inexpensive decoration for a shower, these DIY Hanging Birdcages are special. Made by hand they add that personal touch. Whether you hang the birdcages like a garland, or place them sporadically around the party space, they're sure to add to your bird themed shower!
Thursday, May 22, 2014
Unconventional Save the Dates
Joe and I are officially three months away from the big day!!! Now we hit crunch time. But first I have to back up a bit and talk about Save the Dates.
 |
| Photography by Unveil Loft |
As I thought more about Save the Dates, I realized that as
much as I wanted to send one, I didn't want to spend an arm and a leg. I
also knew a few friends had spent as much money on their Save the
Dates as they did on their invitations. After discussing with my
handsome fiance, we decided to still send a Save the Date but still go a
bit unconventional and make it a little more affordable. Below are a
few non-traditional Save the Dates that your guests will love but won't
hog a chunk of your budget!
 The unconventional piece that we used was to make a Save
the Date video. One of our best friends is an amazing videographer and
we were lucky enough to have him produce our video. Shake was kind
enough to spend the afternoon and evening taking some fun shots of us at
the Stone Arch Bridge, one of our favorite places in Minneapolis, as
well as in the Guthrie. He also grabbed some footage of us at Centennial
Lakes, where we were engaged. Set to a song that Joe and I love, Shake
organized the video and some pictures from the past 6 years to look like
a scrapbook. He did an incredible job, we couldn't be happier with the
final result! Try searching YouTube for other video ideas and you view our Save the Date video here.
The unconventional piece that we used was to make a Save
the Date video. One of our best friends is an amazing videographer and
we were lucky enough to have him produce our video. Shake was kind
enough to spend the afternoon and evening taking some fun shots of us at
the Stone Arch Bridge, one of our favorite places in Minneapolis, as
well as in the Guthrie. He also grabbed some footage of us at Centennial
Lakes, where we were engaged. Set to a song that Joe and I love, Shake
organized the video and some pictures from the past 6 years to look like
a scrapbook. He did an incredible job, we couldn't be happier with the
final result! Try searching YouTube for other video ideas and you view our Save the Date video here. 
Joe and I also decided to send a picture card with the link
to the video, our date and wedding website. These are much more
affordable than thick post cards or custom made cards. This is a great
option for those who still want to mail something but do not have a
large budget. Check out your local Costco or Sam's Club for picture cards or more cost-effective post cards.
A number of couples that we know have chosen to go fully
digital and use Evite or Punchbowl online Save the Dates. These sites
provide adorable templates for free or for a small price. This option is
affordable and still gets the word out at least six months before the
big day. The beauty is that you will then already have guests' email
addresses when RSVPs come around!
My brother and sister-in-law made Save the Date magnets. I
love this idea because it allows people to stick your faces to their
refrigerator with only a small bit of space taken and your wedding date
clear for them to see. Magnets are also easily mailed and inexpensive!
Another fun idea is to create wordle. Use a free online
program to type in the words you'd like (try things like "Save the Date"
and your wedding date or use some words that describe the happy
couple), create with your own wedding colors and then create a jpg and
print at your local printer! Affordable, visually stunning and would
make a cute framed piece of art for your future home. I made a simple one below in our wedding colors but try it yourself at http://www.wordle.net/

Wednesday, May 21, 2014
Elf Makeup
 I am a huge fan of Elf products. Elf can be found at your local Target store and offers an array of makeup products. The factor that sets it apart is that Elf is cheap. Not cheap as in quality, cheap as in incredibly inexpensive. Elf's mascara, liner and a few brushes are $1. You indeed read that correctly, only one dollar. The other amazing part is that the products work well! I bought a name brand liquid eye liner and it doesn't work any better than Elf's $1 liquid liner.
Lisa's top three Elf finds are the following:
Primer: Every girl should use primer. It is a great base for your makeup and keeps it set throughout the day. I had been using an expensive brand name primer until it ran out. Elf's primer is a mere $6 and works like a charm! They also make a spectacular eye shadow primer for $3.
Lip Shaper: Elf makes a great lip liner/shaper pencil. I use the nude side as a highlighter and shaper for right above the top lip. Makes the lip shape pop!
High Definition Powder: I did a lot of reading up on wedding makeup before doing some bridal makeup last summer and this was a big winner for setting powder. Throw a little on after your foundation and blush. Use this powder instead of a mineral powder if you are having high quality pictures taken.
Marie's top three Elf finds are the following:
Waterproof Liquid Liner- I use this liner more for everyday liquid liner due to the thicker brush and it being less dark then their other liquid liner.
Liquid Liner - Lisa was the one to share this with me and ever since it's been my go to liquid liner for those special occasions or night outs. It's brush is incredibly thin and you'll get a sharp thin line out of it, so I usually apply a few coats. Doesn't run easily even thought it's not waterproof.

Flawless Eyeshadow - Beautiful Brown: $2 I like that all 4 brown shadows are in 1 container and that they give specifics for those make-up noobs like me who need help in the beauty application department. They have 4 shadows and are ordered by base, lid, crease, line. There are a few other color pack options: Tantalizing Taupe, Smokey, Happy Hour, Golden Goddess, Party Purple, & Sea Escape.
Other Elf Trials:
$1 Regular/Waterproof Mascara Duo: unimpressed
$2 Make-up Mist & Set: good
$3 Waterproof Lengthening & Volumizing Mascara: fine
Tuesday, May 20, 2014
Mango Coconut Cupcakes

Mango Cupcake Ingredients:
- 1 cup flour
- 1 tsp baking powder
- 1 tsp baking soda
- 1/4 tsp salt
- 1/4 cup oil
- 1/2 cup sugar
- 1 tsp vanilla
- 1 egg
- 1/4 cup water
- 1 cup mango pulp
*Note: Instead of mango pulp, I cut up two mangos and put them in the blender to yield a cup.
Directions:
1. Mix all ingredients together. Beat with mixer until well blended.
2. Bake at 350 for 20 minutes.
*Note: Makes around 15 cupcakes.
Coconut Frosting Ingredients:
- 1 stick butter
- 2 1/2 cups of powered sugar
- 1/4 cup of milk
- 1/2 tsp vanilla
- Dash of coconut extract
Directions:
1. Beat butter, sugar, milk, vanilla and almond extract together until smooth.
2. Add additional sugar as needed. Put into plastic bag, cut one corner and pipe onto cupcakes.
3. Sprinkle coconut and add candied mangos as desired.
Monday, May 19, 2014
Delirium Trilogy


Intrigued by her previous novel Before I Fall, (see blog post for more details) I opted to try reading Lauren Oliver's Delirium trilogy. I read the summary and was like - jeesh I don't know about this. The premise is society has turned into a dystopia on the idea that love, medically referred to as amor deliria nervosa is a disease. That love is what created everyone's problems. Love creates irrational actions and causes hurt feelings for those that had love and also for those that didn't. The solution for this disease, once you reach 18 you'd undergo a procedure to become cured. There is a resistance, people who have succumbed to deliria are willing to fight to the death to maintain it. Even if they are "sick" and therefore don't know any better, they are dealt with harshly.
At this point is anyone else wondering why in the heck I would read this? The plot sounds so juvenille (even if it is for young adults) and unrealistic. Well let me tell you, I too doubted, but I'll always give a book a chance. And soon I found myself sucked in. Yea the action keeps it intriguing, but the innocence of the characters and the development of love between them (you probably saw that coming a mile away) is what kept me spell bound.
Of course there is some predictability to the plots of the 3 books, wouldn't be very good if you were rooting for the protagonists and kept being let down. But there is definitely some unexpected surprises thrown in. Boy do I want to tell you, but I won't ruin it. That'd be cruel. All I gotta say is I'm glad that with each book ending I had the next one ready to go.
So even if you think finding a cure for love is a little outlandish, there is definite truth behind the functionality of the dystopia she created. The author talks about texts that have been altered or banned to promote the idea that love is a sickness. But of course the moral of the story, besides the importance of freedom and choice, is that although love or lack there of can cause unhappiness, it also is the best part of life.
So maybe you're a skeptic like me, but I would give these books a 3.5 star out of 5. Although intended for young adults, it brought me back to the stirrings of love. What it feels like to have a crush, to get excited by that single touch or look, and be completely over the moon crazy. These are stories of young love, the love you get through friendship. And the love that makes your heart soar, can't stop smiling, you'd do anything to make them happy kind of love. And that's something we all can appreciate.
Friday, May 16, 2014
Graduation Tassel Ornament
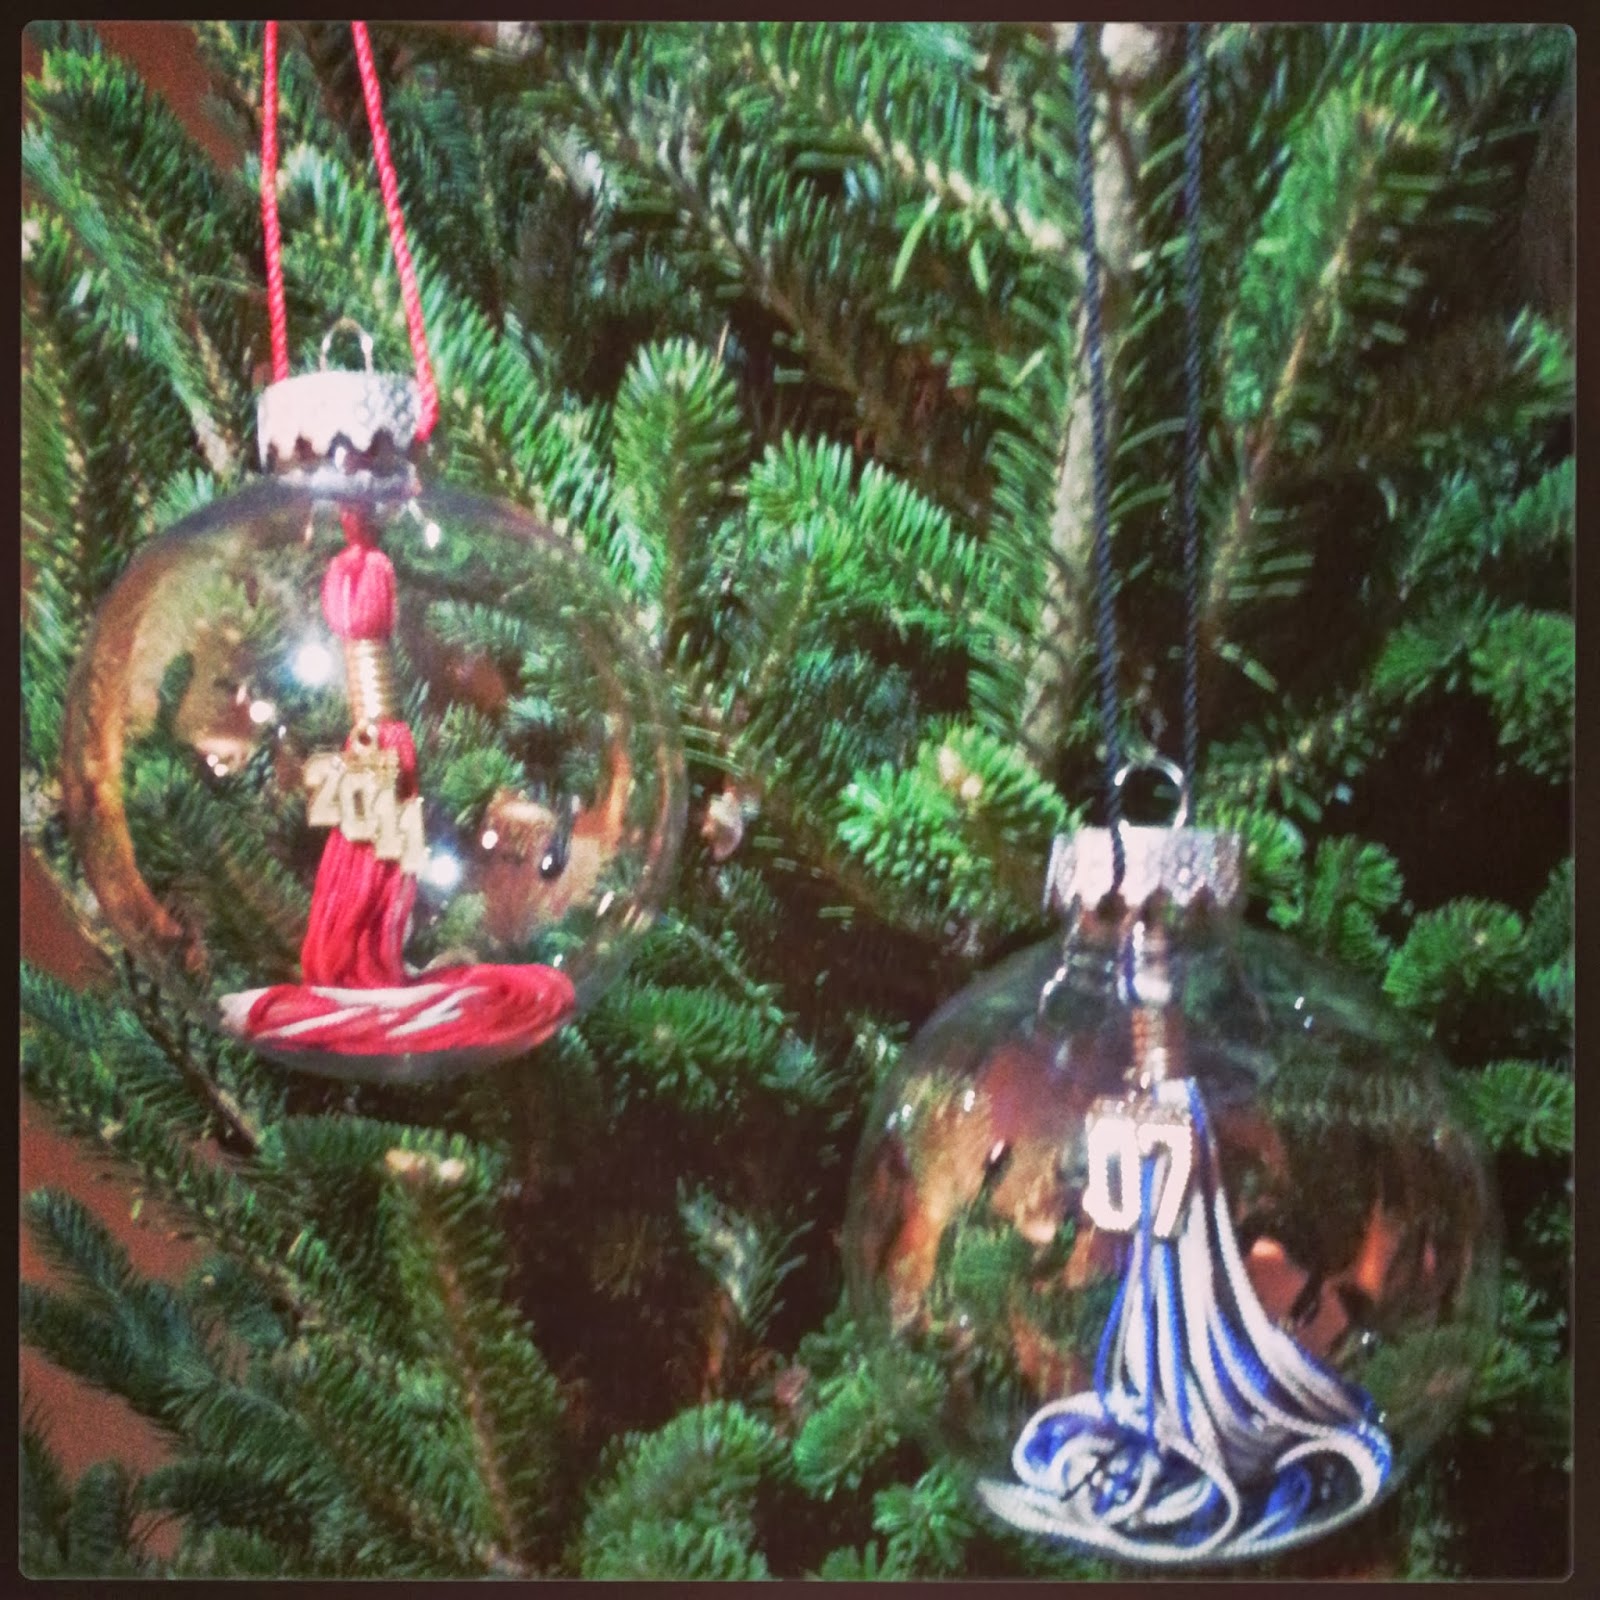 Graduation, the big day everyone spends years working towards is finally there. Once you don the cap and gown, walk across the stage for your diploma, and throw your cap high in the air, those items usually get stuffed in your closet. Yeah some hang the tassels with their high school colors from the rear view mirror before heading off to college, but soon those too are stuffed in a box. Same goes for your college graduation paraphernalia. The newest and super easy way to honor your success and the memories of those school days, is by making an ornament with your tassels. This way you can bring them out once a year at Christmas to serve as a reminder of those times. Plus, you could make it to hang somewhere at your graduation party if you'd like. It's an ornament anyone could make!
  Excited to try this out, I made these 4 graduation tassel ornaments representing my husband's and my school associations. Decided to surprise him with it for a Christmas gift, although I did this more for myself since it's not really his cup of tea. But I figure he'd enjoy his school pride represented on our Christmas tree right alongside mine.
 Materials : All you need are bulbs (plastic or glass) which you can get for $1 or less, and the tassels, that's it!
Note : Now when you go to purchase the bulbs make sure you bring the tassel with you to verify it can fit into the bulb. Totally learned from that mistake.
Time : They take less than 5 minutes to assemble and then VOILA, you made yourself an ornament. Easy peazy lemon squeezy.

Wednesday, May 14, 2014
Graduation Hat Candies & Grad Party Decorations
I have helped my parents as much as possible for my two younger siblings' high school graduation parties whether it be food or decorations or physical and emotional support. When my sister Annie said that she was just going to use the same decorations as my brother's party the year before, I knew it was time to take over. I decided to make a trip to two of my favorite stores, Target and Michael's, to see what I could find. With a few creative ideas and some graduation inspiration, the final pieces were so fun!
I found flower pot tins at Target for $1 each. I grabbed some blue and orange tissue (Annie's future college colors) and weighed the tissue down with a rock in the bottom of the tin. There was one tissue filled tin for every table. Each of these tins had a "2013" cutout glued onto a wooden skewer, stuck into the tissue.
For the second and third tins on each table, I started by cutting some styrofoam balls in half. I hot glued a half in the bottom of each tin in order to keep the wooden skewers secure. I put a grad hat cutout and tinsel pompom in each and filled the bottom of the tin with wrapped candy. I then added grad hat candies to any empty space in the tins (see below for the directions). There were a lot of tables so thankfully, these were a huge hit and I got a ton of compliments on the decorations!

Grad Hat Candies
 Supplies:
- Miniature Reese's Cups, unwrapped
- Almond bark or melted chocolate
- Hershey's chocolate bars broken into squares or Ghirardelli squares
- Pull apart licorice strings
- Wooden skewers
Directions:
1. Unwrap all candy and break the Hershey's bar into squares.
2. Using melted chocolate, attach the Hershey's square, smooth side up, to the smaller side of the Reese's. Let sit until secure.
3. Using melted chocolate, attach licorice piece to the top of the Hershey's square.
4. Put in fridge to allow chocolate to harden and set.
5. Using wooden skewer, very gently insert flat end into the bottom of the Reese's. Put back in fridge until served.
Note: I had some extra melted chocolate so using the wooden skewers, I made some chocolate pops. I put a dollop of chocolate on wax paper, inserted a skewer, added some sprinkles and put into the fridge.
Tuesday, May 13, 2014
Frozen Fruit Cups
 Summer = Fruit.
Once summer rolls around I'm always trying to figure out ways to ingest some of natures nutrients and serving fruit is the easy way. Fruit served plain is good, but served in a juice cocktail mix, that's another step up.
One reason I love these fruit cups is you don't have to worry about the fruit spoiling. Preparing the cups ahead of time and putting them in the freezer makes easy snacks to grab, for kids or adults. And in my case, these fruit cups became our nightly dessert. The satisfaction I get while eating this for dessert, knowing it's solving my sweet craving without the guilt, is a clear win!
It doesn't take long to assemble the cups, then whenever you'll want them, plan on letting them thaw for at least an hour. It's not ice cream or chocolate, but these fruit cups hit the spot, and will earn a spot in your freezer too!
 Frozen Fruit Cups
By: Pioneer Woman
Prep Time: 10 min
Serves 12-14
*Note: I halved this recipe, but kept the same amount of juice and lemon juice, with a result of 9 cups. Thought they tasted great!
Ingredients
4 cups frozen peaches, thawed & chopped
2 cans mandarin oranges, drained
 2 cans crushed pineapple, drained
1 can fruit cocktail, drained
6 medium firm bananas, chopped
1 small can frozen pineapple-orange juice concentrate, thawed
1/3 cup lemon juice
Directions
1) Combine the peaches, oranges, pineapple, fruit cocktail, bananas, juice concentrate and lemon juice in a bowl. Mix it all until well combined.
2) Place in small disposable plastic cups and cover with plastic wrap.
3) Freeze until firm.
4) Remove the cup from freezer 45 minutes to 1 hour before serving to thaw.

Recipe Origin:
I found this recipe on the Foodnetwork.com under Pioneer Woman. She made these fruit cups for a sleepover, and they served as perfect snacks for the kids. Check out her episode "Kidswap Sleepover" to see her make them. We eat right out of the cups, but you could also put it into a bowl once the fruit cup thaws if you'd like.
http://www.foodnetwork.com/recipes/ree-drummond/frozen-fruit-cups-recipe.html
Monday, May 12, 2014
DIY Crayon Art
-001.JPG) This project was a blast! I had seen crayon art and it looked impossible. Naturally, I had to try it! I made this piece for my sister since we both have a slight obsession for Winnie the Pooh characters. It was a bit frustrating that the melting wax had a mind of its own. However, in the end, the weird spurts of wax made it unique and interesting.
This project was a blast! I had seen crayon art and it looked impossible. Naturally, I had to try it! I made this piece for my sister since we both have a slight obsession for Winnie the Pooh characters. It was a bit frustrating that the melting wax had a mind of its own. However, in the end, the weird spurts of wax made it unique and interesting. Supplies:
- Any size canvas
- Crayons or meltable wax in desired colors
- Paint and/or any other medium you want to include
Directions:
1. Start with your initial design with any other mediums. I used a Winnie the Pooh stencil and some acrylic paint to create the little characters at the bottom of the piece.
2. I attempted to use a blow dryer as some tutorials suggested. I found that it wasn't quite hot enough and seemed to scatter the wax in weird ways. In the end, I ended up melting much of the wax by a lighter and letting it drip in a much more clean fashion.
Enjoy! Check out some other canvas projects or our Pinterest page to see some other crayon ideas!
Thursday, May 8, 2014
The Fallen Sequence

Sneak peek at Fallen:
There's something achingly familiar about Daniel Grigori. Mysterious and aloof, he captures Luce Price's attention from the moment she sees him on her first day at Sword and Cross boarding school. He's the one bright spot in a place where the students are forced to be there, surveilled by cameras and faculty watching their every move. Except Daniel goes out of his way to avoid Luce. Drawn like a moth to a flame, Luce is determined to find out what Daniel is desperate to keep secret...even if it kills her.
Books:
Fallen Torment Passion Fallen in Love Rapture
Author: Lauren Kate
Dangerously exciting and darkly romantic, Fallen novels are page turning thrillers and the ultimate love series.
Wednesday, May 7, 2014
Knapsack of Hope
.jpg) Another school year has come and gone. Any day your students will be leaving your classroom and on their way to the next grade. An especially big and exciting jump is the one 8th grade students will be making as they enter high school in the fall. To send them on their way with well wishes from the teachers you can make "Knapsacks of Hope."
Another school year has come and gone. Any day your students will be leaving your classroom and on their way to the next grade. An especially big and exciting jump is the one 8th grade students will be making as they enter high school in the fall. To send them on their way with well wishes from the teachers you can make "Knapsacks of Hope."In the knapsack you an include 6 supplies commonly used amongst students. These items are easy to purchase in bulk, which you'll want to do if you have a whole team or two at your school. This of course can be tailored to any grade level, even graduating seniors, they just might find it extremely corny. But I'm all about corny.
All you need to assemble are the 6 items, cellophane bags, twist ties and a note explaining all the bag's contents. If you're doing this with other teachers, the process should be even easier to tackle during a team meeting. These bags are a great way to wrap up the year for the faculty and the students, helping everyone leave on a positive note. And who knows maybe a few will keep it as a keepsake, but if not at least they'll put all the pieces to good use.
.jpg) A Knapsack of Hope
A Knapsack of Hope
to take with you on your new adventure
A star to remind you to keep shining.
A paperclip to help you hold things together.
A pencil to help you continue to write your life story.
An eraser to fix all of the small mistakes.
A penny so you're never broke.
A rubber band to help you stretch beyond your limits.
A simple gesture to send your students off with the support and encouragement you've been giving them all year.
Tuesday, May 6, 2014
Lemon Cupcakes with Marshmallow Topping
If I haven't said it enough, I adore cupcakes. My sister and I had such a blast spending hours in the kitchen making these for our family. The Lemon Marshmallow was the second kind of cupcake that we whipped up a few weeks ago for family birthdays. Spoiler, the third recipe will come in a couple of weeks.
Lemon Cupcake
We used a box recipe for this cupcake. While box mixes can be hit or miss, we loved this cake. I am convinced that it was because we purposely bought the "moist" labeled Pillsbury brand. The cake came out moist and perfectly lemony. Since the marshmallow topping is more mild, the lemon was the perfect compliment.
In half the cupcakes, we baked a lemon Oreo at the bottom. Add the Oreo to your cupcake before pouring the batter in. On the other half, we just spread lemon Oreo crumbles on the top.
Marshmallow Topping
Ingredients:
- 2 egg whites
- 1/4 tsp salt
- 1/4 cup of sugar
- 3/4 cup light Karo Syrup
- 1 tsp vanilla
Directions:
1. Beat egg whites and salt together until very frothy.
2. Slowly add sugar, beat until smooth and glossy.
3. Slowly add Karo syrup and beat until stiff peaks.
4. Fold in vanilla. Pipe onto cupcakes as desired.


Monday, May 5, 2014
Vintage Bridal Shower
 |
| Apryl Rose Photography |
To me a vintage shower means tying the great things of the past and presenting them in an elegant fashion with the celebration of a promising future for the couple. It's such a blessing to be a part of a bridal shower, especially someone as loved as Megan. She has a special place in our hearts as the oldest girl amongst us cousins, and it's great to be able to honor her. Hosted at my mother's home, with the help of Megan's aunts and some of us cousins, everyone was able to pull together decorations, food, games and gifts that made a memorable event.
A Vintage Bridal Shower can also be intertwined with the Something Old, Something New, Something Borrowed and Something Blue bridal shower. You'll see parts of these traditions appearing in the details throughout the shower breakdown. What's truly fun about having a vintage shower is all the decorations that can be collected from the family and put on display. And then having games that play on wedding traditions carried on throughout the ages that play a role in weddings today.
With a mix of the old and celebration of the new, a vintage shower is a classic choice for those classic brides.

Decoration
The fun part of decorating for this shower is compiling all the something olds and something blues to create a vintage feel. This is where you go to the attic and boxes with treasures stored away and get to put them to use. Ask around to family members for them to unearth their own treasures and soon you'll have a part of your family history adding to your special celebration.
Items that work great for a Vintage Shower:
- Break out the doilies, lace table cloths and runners passed down through generations. Tulle bows, and ribbons are great details. "Something Borrowed & Old"
- My mom had the great idea to find vases that fit the times, and place some white/cream roses to up the elegance (great gift for the bride to take home with her after the shower). Tie in the "Something Blue" with a basket of blue flowers and wrap it in tulle.
- "Something Old" that was used for our cousin's shower was a fur coat from my Grandma's era, a purse, pearls, candle sticks, mirrors etc. Finding fun items like hats, lamps, suitcases, boxes, baskets or other older pieces really can add to the overall vintage feel.
- "Old & New" Ancestry pictures (check out our Ancestry Collage wall ) and 8x10 pictures of the newly engaged couple displayed on the mantle. Especially if it's a vintage photo shoot the engagement photos make great pieces.
- Looking for a "Something New", make a station for the bride's many new presents she'll be opening.

 Food
FoodBrunch seems the perfect time to host a vintage bridal shower. A shower with a vintage feel boasts of afternoon tea, pastries, mimosas and refinery.
Food ideas to consider:
-popovers, scones, quiche, muffins, finger sandwiches, a light salad, and fruit.
-With desserts being little treat delights consisting of bars, cookies, creme puffs etc.
Games
.jpg)
- On the hunt to create an original game for my cousin's bridal shower, I came up with this one. Based on the idea of wedding dresses being an important part of every bride's day, but the fact that the dresses tend to be a reflection of the times and thereby are ever changing, I thought it would be fun to make a game out of looking back across the ages comparing bridal dresses from each decade.
- To play the guests will look at all the wedding dress pictures lined up (this game also serves as decoration if you hang it on a mantle by stringing ribbon through each picture and attaching it to the mantle in swags) and need to match the corresponding letter on the picture to the decade they believe the dress is from on their game card. After all the guests have had a chance to fill their game card the host shows the guests the pictures chronologically, and the guests see how many they got right. If necessary, there is even a tie breaker picture.

- Take a look at the picture to check out the game cards I made, simple and 2 fit on a 8x11 sheet of paper. The game had a total of 11 pictures, starting back in the 1900's and providing one for each of the following decades. I used this website to find most of the pictures, choosing just 1 to represent the decade: http://www.bridalguide.com/planning/wedding-planning-basics/weddings-through-the-ages . You can supplement with your own family wedding photos for some easy points for your guests if you decide against having ancestry photos for decor.
- My mother and I compiled the pictures, arranged them so they wouldn't be in order, attached them to blue paper for that touch of "Something Blue", added a letter in glitter and strung ribbon through the slits we cut to hang the pictures on our fireplace mantle.
 Guess Who? Bride or Groom?
 - A game that is centered around the bride and groom is always fun to play at the shower, since it allows the guests to discover more about the couple. The guess who game is great because it can be done individually or in partners, and gives the bride the chance to go over the answers at the end, and add any stories to some of the questions.
- See the Guess Who game card for ideas on questions about the bride and groom.
- Where do all the wedding traditions come from? In a game designed around the traditions that make their way into weddings, guests match the tradition with their guess of the reason why it was put in place.
- Examples of questions guests answer are;
- Why is the ring placed on the ring finger? The finger contains the vein that goes directly to the heart, a symbol of love
- Bride throws the bouquet because why? To pass on the bride's good fortune
- What's the purpose of a ring bearer - marriage is doomed if the ring is dropped by the groom
- Carrying the bride over the threshold - The bride tripping meant bad luck
- Why does the bride stand to the left of the groom? To defend his bride his right arm must be free.
 |
| Apryl Rose Photography |
A Vintage Bridal Shower is such a classic theme to dedicate to the bride, and was perfectly fitting for our cousin Megan. A mix of fun games, delicious food, gifts for their new life, and great company makes for a memorable day. How great to be able to honor Megan with a shower as elegant and classic as she is!
Congratulations Megan and Leonard!
Check out our other bridal shower themes (more games, food & decor ideas):
She's Hooked Bridal Shower
Throwing the bride a Bachelorette party? Here are some ideas:
"Wedding Day" Theme
Western Hoedown Theme
Beauty and the Beast Theme
Crafts and gifts for Bridal Shower/Bachelorette:
Bridal Memory Book
Family Recipe Binder
Memorable Moments Log
I love you because...message frame
Throwing the bride a Bachelorette party? Here are some ideas:
"Wedding Day" Theme
Western Hoedown Theme
Beauty and the Beast Theme
Crafts and gifts for Bridal Shower/Bachelorette:
Bridal Memory Book
Family Recipe Binder
Memorable Moments Log
I love you because...message frame
Saturday, May 3, 2014
Kentucky Derby Attire
This weekend is the annual Kentucky Derby. While I am posted up with the flu, I am dreaming of the big hats and beautiful dresses being worn today. One of my coworkers even borrowed my big black hat for her Derby party this weekend. In anticipation of writing this post, I did a little research into appropriate Derby outfits. Kentucky Derby has a whole webpage on their site about women's attire for the races. These suggestions include thoughts and ideas for hats and outfits. It seems that while the clubhouse sports more classy and fashionable hat styles, the infield hats take a more wild turn.
Kentucky Derby suggests either picking your dress first and making a custom hat with ribbons, flowers or other pieces around your house, or pick out a drop-dead-gorgeous hat and plan your outfit around that. Find something that fits your personality to stand out in when you are sipping the classic Derby drink, mint juleps.
Here are a few of my favorite Derby looks, find them on Pinterest! Whether you are looking to win the Best Dressed Hat contest or looking to bet on your favorite horse, good luck this weekend!


Subscribe to:
Posts (Atom)