Monday, November 9, 2015

DIY Glitter Pumpkins

When Halloween is over, I usually have to restrain myself from immediately putting the pumpkin decor away and pulling out my boxes of Christmas goodies. But this year, I had some fun ideas for how to use my pumpkins from my fall tablescape.

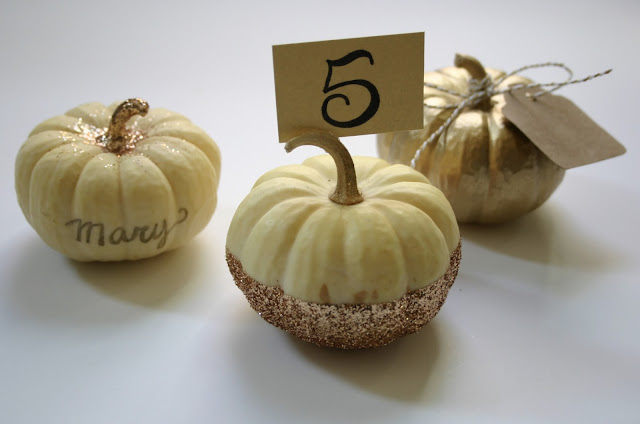
This year, I used my leftover white pumpkins {which in reality turned a little yellow over the past few weeks} to make a few pumpkin place cards, table numbers and party favors! These would be so pretty for at your Thanksgiving table or for a fall bridal shower. These pumpkins are inexpensive and easy but would be stunning additions to your table!


Pumpkin Place Card

This place card pumpkin is so delicate and simple! Plus you can add a pop of glitter and color without making a huge mess.


Supplies:
- Mini Pumpkin
- ModPodge
- Paint Brush
- Glitter
- Pen

Directions:
1. Paint your ModPodge on the stem and around the top of your pumpkin.
2. Add glitter onto ModPodge. Allow time to dry.
3. Add guest's name to the front of the pumpkin.


Pumpkin Table Number

While I used this pumpkin for a table number, you could also customize the little card into a place card or food menu card. I love this glitter pumpkin design because it is classy and elegant.


Supplies:
- Mini Pumpkin
- ModPodge
- Paint Brush
- Glitter
- Painter's Tape
- Knife
- Table number


Directions:
1. Start by taping the top of your pumpkin using the painter's tape.


2. Using your paint brush, spread ModPodge on the bottom of the pumpkin.
3. Add glitter to the painted area.


4. Remove the tape carefully.
5. Use a knife to cut a small slit in the top of the pumpkin stem.
6. Add your table number and display!


Pumpkin Party Favor

Last but not least, this shiny pumpkin was so incredibly easy and fast to make, it felt like cheating to call it a DIY! This could look stunning in different colors, especially if you are looking to match wedding colors or your Thanksgiving Day centerpiece. The pumpkin could sit at each guest's place setting as a take home favor!


Supplies:
- Mini Pumpkin
- Spray Paint
- Twine
- Tag


Directions:
1. Spray the pumpkin with desired spray paint.


2. Allow the pumpkin time to dry before adding the twine and tag. Add a guest's name or a short message to the tag!


That's it!! I hope you are able to find a few minutes to make these pretties for your Thanksgiving table, a Friendsgiving dinner or an upcoming fall bridal event. Happy November!!


Thursday, November 5, 2015

Paris Travel Highlights

Marie and I were recently laughing at our total opposite blogging schedule. She is a teacher so the summertime is when she is able to blog more freely. The summertime is my busy season with corporate events and weddings so the fall and winter is my best time to blog. But that is the beauty of having an awesome blogging partner! We are able to keep up with the ebbs and flows of our very busy lives. Thanks for sticking in there with us as we try to navigate through this crazy ride!

Speaking of life being busy... I am just now getting the chance to go through the photos from our two week France and Ireland trip that happened in May. I am excited to finally share some of the highlights from the trip!

Paris, France

Paris was amazing. We flew directly from Minneapolis to Paris and hit the ground running, quite literally. We only had a few days in this city and we wanted to make the most of them. It made for an exhausting few days but it was wonderful!

The flower markets were picture perfect!

And thus began my obsession with macarons!

I wanted to go back the minute that we left if only for another croissant and glass of rose, which happened to be cheaper than a Coke! I could not get enough of the macarons, cappuccinos, wine, pastries, crepes, the list goes on! Even my husband was obsessed with the chocolate croissants because the chocolate was the best we have tasted. Food aside, here are some of the other highlights from the Paris leg of the trip.

The beautiful Eiffel Tower at night!
Palace of Versailles

These golden gates were breathtaking! We felt like we barely scratched the surface on exploring this massive palace. The rooms were incredible and the gardens were beyond compare!


Eiffel Tower from the Arc De Triumphe

I was glad that no one told us how many steps it would take to get to the top of the Arc de Triumphe. We walked more in Paris than I have in a long time and our behinds were quite sore! But it was totally worth it. Since Paris has building height restrictions, I couldn't imagine a more beautiful view of the city!


Napoleon's Apartments, The Louvre

It took us an embarrassing amount of time to find Napoleon's Apartments in the Lourve. The museum is massive! We had arrived when the museum had opened and eventually made our way past the Mona Lisa to see the apartments in full glory. I definitely have some major chandelier goals after this trip!


Paris is always a good idea! - Audrey Hepburn 

Tuesday, October 20, 2015

Baked Dessert Apples

These seriously might be the best baked apples of ALL TIME! I can say that hands down, this is my favorite fall recipe that I have tried this year. Plus, the recipe is quick, easy and pretty much anyone could make these. We decided to use the slightly more pricey, Minnesota picked apples. It was worth it! These little guys tasted like a combo of caramel apples and apple pie. I will definitely be making these again before fall is over!

Ingredients:
- Four apples
Note: We used MN seasonal Honeycrisp apples
- Caramels, two per apple
- Four tablespoons of butter
- Two teaspoons of cinnamon
- Six tablespoons of brown sugar
- Two tablespoons of flour

Directions:

1. Start by removing the core of your apple. We tried to leave the bottom of the core in the apple. We used a corer and then a knife to cut out the core.


2. Cut two circles in the inside of your apple. Then cut the sides of the apple to create cube-like cuts in your apple.


3. Place your two caramels inside the apple.


4. Melt the butter and brown sugar in the microwave for 30 seconds. Then mix in the cinnamon and the flour.


5. Spoon the mixture over the apple. We noted that next time, we would shift the apple around gently in order to allow the mixture to better sink into the cuts in the apple.


6. Bake the apples at 375 degrees for 25 minutes. We also noted in this step that for larger apples, they needed more cook time. Since we used Honeycrisp, which are very large, we needed to cook for 45 minutes to achieve a soft apple and melting caramel.


7. Allow to cool and then enjoy! You can add a scoop of cinnamon ice cream for the perfect fall dessert!


Monday, October 19, 2015

Monogram Pumpkin

This may be the easiest monogrammed pumpkin projects of all time!


I have been loving white pumpkins this fall. While making a stop in my local Michaels, I noticed that they had copious amounts of artificial white pumpkins. Since they were on sale, I grabbed one for this project along with a jeweled monogram letter. Normally, I would prefer carving a real pumpkin but since I wanted this one to be reusable for the future, I was ok going with an artificial option.

Supplies: 
- Pumpkin, real or artificial
- Sticker or decal

Directions: 
1. Make sure your surface is clean.


2. Add the sticker or decal in desired location.
Note: If you want to really get into the full fall spirit, you can stencil your pumpkin and then carve out your letter.


Seriously, that is all folks! No messy seeds or stringy pumpkin matter. Just a super cute pumpkin for a tablescape display or on your front porch. Happy Monday and happy crafting!


Friday, October 9, 2015

Outlander Series


Read this series! And if you don't want to tackle the whole series read the first book titled Outlander.  The first novel appears on best to read romance lists, so you know you gotta check it out if you're into romance.  But I have a feeling once you begin, your curiosity won't be sated until you've read the series.

These books are lengthy compared to the typical book, it was for this reason (and the fact that I had to borrow from libraries before I got a kindle) that it took me a couple years to finish the series.  And her most recent book came out last year, so I'll be back at it. 

Why read this?  One, she's a good writer - take my opinion and the other thousands who've read the books.  Two, it's historical fiction, and who doesn't love historical fiction?  No on better be raising their hand.  Three, leading off of my second point, the setting throughout the series takes place across the Ocean in Europe and throughout America.  And what makes it more juicy, the books occur during big historical change and yet also in our time period.

Did I mention these have a splash of time travel adventures.  Now who isn't intrigued?  Love, war, betrayal, family, survival, and playing with history, are all the good makings of a memorable series.  And the Outlander series is certainly that.

http://www.dianagabaldon.com/books/outlander-series/
Books in the Series:

1. Outlander
2. Dragonfly In Amber
3. Voyager
4. Drums of Autumn
5. Fiery Cross
6. A Breath of Snow and Ashes
7. An Echo In The Bone
8. Written In My Own Hearts Blood

Author:
Diana Gabaldon
 

Wednesday, October 7, 2015

Apple Roses Recipe


Fall is the best season of all! Pumpkin everything, sweater weather, hot coffee, scarves and apple picking are always on the autumn to-do list. I also really enjoy fall baking with fresh apples or some delicious pumpkin spice. My in-laws kindly shared some of their backyard apples with us recently and I had just enough to bake a little apple dish. I have seen this Apple Rose recipe floating around my social media feeds the last couple of weeks and decided to try it for myself. It looked easy enough and had a short ingredient list. There were definitely some bumps along the way but hopefully, anyone who tries this can learn from my struggles!

Apple Roses Recipe

Ingredients:
- 1 package of puff pastry (2 sheets, thawed)
- 1/3 cup of apricot preserves
- Cinnamon
- 1/2 lemon (squeezed for the juice)
- 5 smaller backyard apples or 3 large grocery/orchard apples
*Note: As I mention below, I would suggest using larger apples.
- Powered sugar as a garnish


Directions:
1. Start by cutting all of your apples into halves and then into thin slices.


2. Place apple slices into a bowl. Add water and lemon juice from half a lemon. Microwave the apples 5 minutes or until they are soft and bendable.

*Note: This look some trial and error. Just make sure the apples are soft enough so you can roll them later. When the apples were finally cooked long enough, they were slightly translucent.


3. In another bowl, place 1/3 cup of apricot preservatives and 1/4 cup of warm water. Stir until smooth.

4. Lay out the puff pastry and use a rolling pin to stretch and flatten the dough. Use a pizza cutter to cut five strips per pastry sheet.

5. Take a spoonful of the preservatives and place in the middle of the dough. Then carefully place a layer of apple strips at the top of the pastry strip.


6. Sprinkle cinnamon along the apples edge. Then carefully fold up the bottom of the pastry strip to meet the top. Your apples should peek up over the folded strip.


7. Begin to roll one end of the strip to the other until you have a pinwheel that looks like a rose.

*Note: This was a bit of a struggle for me. Because I used small apples, my apple slices kept wiggling loose while I was wrapping it. Next time, I will try using larger apples to help the pieces stay in place.


8. Place the apple roses in a greased muffin pan. Bake at 375 degrees for 35-45 minutes or until the pastry is golden brown.


9. Garnish with a little powered sugar and enjoy your warm treats!


I appreciate that these delicious pastries are very tasty without loads of added sugar. These would be darling for a bridal shower, girls night or a fall get together. I'd love to hear your feedback on the recipe you try them! Bon appetite!!

Sunday, October 4, 2015

Find the Good

Unexpected Life Lessons from a Small Town Obituary Writer

A gem, and a real joy to read! This book is full of relatable stories of real people living in a small town.  It's an authentic sharing of intimate experiences and realizations, that lead us readers inspired to find the good.

Makes a great book club read by inspiring discussion and thought provoking questions.  If you read it on your own like I did, you can't help but bring it up to others. It's one of those books that just has to be delved into further.  It's a light read, quick, and fulfilling.

After reading this book I made a decision to start taking a look at the obituary section. Always thought it was too morbid. That it's something that older people do.  I always thought it was due to the extra time on their hands, and the fact that the likelihood they know someone who may appear in the obituary section increases as you get older.   But there's more to it.  I've never had to think about how hard it would be to sum up a person's life in just a few sentences.  What's worth saying? How do you want to be remembered? Heather Lende did a dynamite job of explaining what life lessons can be obtained from simply looking closer at someone's life and finding the good in everyone, because it's there, you just have to find it.

http://www.heatherlende.com/find-goodSome of the Chapter Titles that might intrigue you like they did me:

*Pretty Good is Better Than Perfect

*Draw Lines in the Sand So You Can Move Them

*Hold on Tight

*Take the Kind of Happiness that Comes Your Way

*Give Yourself to Love

*Listen to Your Mother

*Tell Them You'll Miss Them When They're Gone

*Make Your Own Good Weather