Craft Corner, Paint the Town, Beauty Parlor, What's Cooking, Let's Party, Bookshelf, World Wanderer
Monday, April 24, 2017
Friday, April 7, 2017
DIY Twine Eggs
Hello!! Sorry for the brief blog hiatus, Marie and I have been very busy bees lately! I am so excited to share all of the Easter crafts that I have been working on. So cute, easy and kind to the wallet! Tonight I am geeking out about these beautiful twine eggs.
DIY Twine Easter Eggs
Supplies:
- Foam eggs (Plastic would work too!)
- Twine or rope
- Glue gun
Directions:
1. Begin at the wider end of the egg. I learned this the hard way! It is very hard to wrap the twine when starting on the smaller end. Glue the end of the twine to the egg.
2. Start to wrap the twine so that each layer is flush with the last. Add glue as needed.
3. Complete the egg by gluing the last bit of twine to the top of the egg.
Simple, sweet and shabby chic!
Monday, April 3, 2017
Easter DIY Projects
This past weekend was chalk full of Easter crafts. Mostly because I know that eggs and bunnies have a limited time within our house but also because it is finally spring!! I have been sharing some of these crafts through Instagram but wanted to post some tutorials in case anyone is interested in trying them this weekend.
Sequin Egg
Supplies:
- Sequins
- Pins or nails
*Note: I used thin craft nails found at Michael's
- Foam egg
Directions:
1. Starting at the top, begin pinning each sequin into place with a pin.
2. Make sure to cover each sequin so that the white foam does not show. Continue pinning the sequence until the egg is covered.
String Egg
Supplies:
- String
- Hot glue gun
- Foam egg
Directions:
1. Starting at the top, glue down the first piece of string. Begin wrapping the string around the foam, gluing as you go.
2. Continue gluing until the egg is covered. Carefully place a dot of glue at the bottom of the egg and glue the end of the string into place.
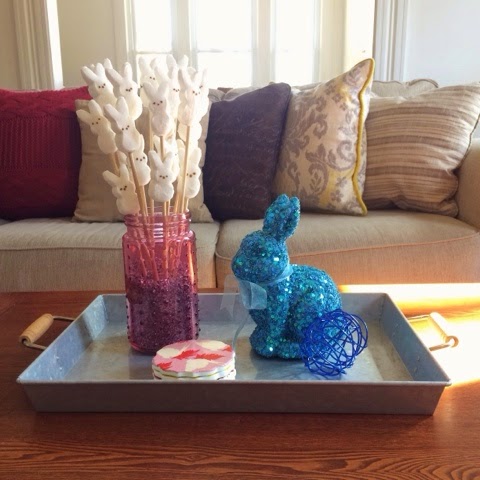
Bunny Bouquet
Supplies:
- Two packages of Peeps
- Wooden dowels
*I found a package of 16 dowels for $1.97 at Walmart.
- Vase or jar
*Note: I used vase filler to keep the dowels upright
Directions:
1. Take a sharp knife and cut each Peep in half.
2. Insert the wooden dowel into the open Peep and then stick the marshmallow closed.
*Note: I did some dowels with two bunnies and some with one on the top.
3. Position your bunny sticks as you prefer.
Monday, February 20, 2017
Abraham Lincoln sites - President's Day
And since I love to travel and visit historic sites you can bet your bottom dollar I seize any opportunities to see sites relating to Lincoln. Hoping to add the monument and museum in Springfield Illinois to my list. These sites are extremely popular, and I hope families get the chance to see these monuments dedicated to one of the most loved presidents that's served our great country.
"History is not history unless it is the truth."
"Bad promises are better broken than kept."
"Broken eggs cannot be mended."
"My father taught me to work, but not to love it. I never did like to work, and I don't deny it. I'd rather read, tell stories, crack jokes, talk and laugh - anything but work."
"Better to remain silent and be thought a fool than to speak out and remove all doubt."
Abraham Lincoln Birthplace National Historical Park - Kentucky
On our family RV trip we planned to make a stop at Lincoln's birthplace. Since I was doing most of the event planning this was definitely going to be stop on our loop. What added to the experience was the fact that we almost missed the whole thing! If you've ever dealt with time zone change then you know the line isn't a straight line, but in fact curves in and out. So the closing time for the historic park was actually an hour earlier, and by the time we realized it, we were booking that RV down those side roads faster then was probably safe and flew into the park just in time.
Picked up this miniature bust of Lincoln as a small token of our visit. Makes a perfect item for my teacher desk.
One of Abraham Lincoln's most famous speeches was his Gettysburg Address in 1863 after the three day July battle. Lincoln delivered his classic speech at the dedication of a national cemetery at Gettysburg to commemorate all the lives on both the union and confederacy side that had been sacrificed. It was one of the greatest expressions of democracy in American history.
Even back when my family visited the battle site in my early school years I still remember that feeling when driving through the park and stopping at the Minnesota memorial. My love of learning about the Civil War has only continued to grow. In college I was lucky to have taken a class just on the Civil War my freshman year. I was completely in my element in that class. I was able to read so many great books on the subject and we even memorized the Lincoln's Gettysburg Address.
I hope that I'll be able to venture over to the site again next time I'm in Ohio, since I know that it would certainly mean even more to me today.
Mount Rushmore - South Dakota
One of my favorite monuments honoring our past presidents, carved into the side of the Black Hills of South Dakota is Mount Rushmore. This National Memorial is visited by nearly 3 million people a year who wish to marvel at the astounding man-made creation carved into nature’s creation. When you stand at the base of this gigantic memorial it is hard not to be amazed.
"The
purpose of the memorial is to communicate the founding, expansion,
preservation, and unification of the United States with colossal statues of
Washington, Jefferson, Lincoln, and Theodore Roosevelt."
Gutzon Borglum
Gutzon Borglum
Clearly I was not the only one to think that these were
the best of the best in regards to our presidential leaders. Even back in
grade school when I visited this memorial on a family vacation I was
captivated. I'm looking forward to returning with my own family one
day. And since some of my students have been, I always love teaching about Mount Rushmore's construction in my U.S. History class.
Lincoln Memorial - Washington D.C.
Before starting my history teaching job, my husband and I took a spontaneous trip to D.C. over the summer. I haven't been to D.C. since I visited in sixth grade with my family, so I've been dying for another opportunity. It was great to tour all the memorials again, especially with a friend that's a D.C. native. Make sure you have your walking shoes if you visit, cause boy did we get our exercise over those 3 days.
Although I value all the memorials, my most anticipated was of course the Lincoln Memorial!!!
Monday, February 6, 2017
DIY Cork Board Arrow
Recently, I have had an intense desire to re-organize and re-arrange our home. Is anyone else suffering from this?! I am wondering if it is the time of year or if I just need a fresh look. Either way, I have found a couple projects to help... so far!
I just finished a new command center area in our kitchen. A command center is usually your "drop site" for all things scheduling and paperwork. I will share more photos of the whole set up soon but for now, here are all the details on my super easy and quick DIY cord board arrow project.
DIY Cork Board Arrow
Supplies:
- Wooden shape (Arrow from Target)
- One 12 by 12 inch cork pad
- Glue (Hot glue or E6000 preferred)
- Scissors
- Push pins, as desired
1. Start by measuring out each piece to match the arrow shape. I only needed one piece of cork pad but you may need more depending on your shape. I preferred my arrow to look like it was different pieces versus one whole piece so cut mine accordingly.
2. Glue each cork piece as desired. I had to be careful to hold mine in place until secure.
3. Allow the glue adequate time to dry before hanging on the wall or inserting push pins.
Wednesday, February 1, 2017
Paper Arrows
Valentine's Day is right around the corner! While some complain that it is a Hallmark holiday, I think we should all use it to spread a little extra love. Send an old friend a card in the mail, send a valentine to your godbaby or just write some simple words of appreciation to your other half.
One craft that I will be including in my valentines this year are these pretty paper arrows. Arrows have become a huge trend of late. I have been seeing them everywhere! Since I have a total feather obsession, I find arrows quite lovely. Naturally, I had to try to DIY a few of my own.
Supplies:
- Paper Straws (Found at Walmart)
- Wasabi Tape (Found at Target)
- Card Stock (Found at Michaels)
- String and/or yarn (Found at Michaels and Target)
- Hot Glue Gun
- Scissors
Directions:
1. Start by cutting out different size feathers from the card stock. Also, cut out the tips of the arrows as well.
2. Hot glue the feather cut outs to one end of the paper straw. Glue the arrow tip to the other end.
3. Wrap the top of the arrow with string or yarn. Glue into place.
4. Embellish as desired!
These beauties will be accompanying some other valentine's day goodies. I cannot wait to send them out to loved ones! Bring it on Cupid! XOXO
One craft that I will be including in my valentines this year are these pretty paper arrows. Arrows have become a huge trend of late. I have been seeing them everywhere! Since I have a total feather obsession, I find arrows quite lovely. Naturally, I had to try to DIY a few of my own.
Supplies:
- Paper Straws (Found at Walmart)
- Wasabi Tape (Found at Target)
- Card Stock (Found at Michaels)
- String and/or yarn (Found at Michaels and Target)
- Hot Glue Gun
- Scissors
Directions:
1. Start by cutting out different size feathers from the card stock. Also, cut out the tips of the arrows as well.
2. Hot glue the feather cut outs to one end of the paper straw. Glue the arrow tip to the other end.
3. Wrap the top of the arrow with string or yarn. Glue into place.
4. Embellish as desired!
These beauties will be accompanying some other valentine's day goodies. I cannot wait to send them out to loved ones! Bring it on Cupid! XOXO
Sunday, January 29, 2017
DIY Paper Roses
This darling heart canvas was used on my wedding day and is now perfect to pull out for Valentine's Day!
Since I recently used it to decorate our home for Love Day, I thought would resurface this blog post to share with those who are looking to add some pretty heart elements to their home this season.
Paper Roses
Supplies:
- Card stock paper in varied colors and patterns
- Glue gun
- Scissors
- Canvas or other base piece
Directions:
1. Begin by cutting circles. I cut different sizes so that my roses were different sizes. Then cut a spiral in the circle. I preferred my roses to not have perfect edges but if you want perfect edges, cut your spiral edges in the same length.
2. Begin wrapping your rose from the outside edge of the spiral and twist into the center.
3. Glue as you go but ultimately, glue the paper together at the end.
4. Position roses on your canvas as desired. I used a burlap canvas, one of my new favorite things! I placed the roses into a heart and hot glued them in place.
If hearts are not your thing, I have used these paper roses in several other ways!
I wanted to find some inexpensive ways to bring more yellow into our gray/white/yellow bedroom theme. I also had a frame that no longer had a glass piece. I whipped up a couple of these paper roses and painted the frame to match the decor. We get so many compliments on our wall arrangement!
I just love how easy and dynamic these paper roses are. Happy crafting!!
Since I recently used it to decorate our home for Love Day, I thought would resurface this blog post to share with those who are looking to add some pretty heart elements to their home this season.
Paper Roses
Supplies:
- Card stock paper in varied colors and patterns
- Glue gun
- Scissors
- Canvas or other base piece
1. Begin by cutting circles. I cut different sizes so that my roses were different sizes. Then cut a spiral in the circle. I preferred my roses to not have perfect edges but if you want perfect edges, cut your spiral edges in the same length.
2. Begin wrapping your rose from the outside edge of the spiral and twist into the center.
3. Glue as you go but ultimately, glue the paper together at the end.
4. Position roses on your canvas as desired. I used a burlap canvas, one of my new favorite things! I placed the roses into a heart and hot glued them in place.
If hearts are not your thing, I have used these paper roses in several other ways!
I wanted to find some inexpensive ways to bring more yellow into our gray/white/yellow bedroom theme. I also had a frame that no longer had a glass piece. I whipped up a couple of these paper roses and painted the frame to match the decor. We get so many compliments on our wall arrangement!
I just love how easy and dynamic these paper roses are. Happy crafting!!
Subscribe to:
Posts (Atom)